Maximize your ROI and your yield.
This webinar focuses on dehumidification and how to properly size, specify and install your solution, as well as new tools and resources available to growers.
Featuring
Chapters
0:00 – Webinar Introduction by Eric Sandy
1:12 – Introduction
5:57 – Efficiency
7:21 – ROI example
8:51 – Heat gain
10:06 – Rebate possibilities
12:32 – Rebate success stories
15:17 – Proper sizing
16:59 – Proper specification
19:34 – Placement
21:23 – P-Traps
26:04 – Ducting
28:21 – Control wiring
29:28 – Proper voltage
36:01 – Quick note on controls
38:13 – One last thing
Webinar transcript
An edited version of this webinar’s full transcript has been provided below for your convenience.
Eric Sandy — Hello, everyone. Welcome to today’s webinar; How to Make Your Grow Room HVAC Work for You. My name is Eric Sandy, and I’m the digital editor of Cannabis Business Times. We are very pleased today to welcome Josh Spalding from Quest and Aaron Hook from Hawthorne Gardening Company for today’s event, where you’re going to learn how to make your HVAC work for you with the end goal to maximize your ROI and your yield.
Today, we’ll be focusing on dehumidification and how to properly size, specify and install your solution as well as new tools and resources available to growers. Before we begin with the presentation, just a few quick notes. You’re going to see at the bottom of your screen, a Q and A button. If you click that, you’ll open the Q and A box. Feel free to type your Questions in throughout the presentation. And at the end of today’s event, we’re going to try to get to as many Questions as possible. Also, just note that we are recording today’s event and we will be distributing that recording to all registrants via email. So you will have all the slides and the whole presentation delivered to your email very soon. With all that being said, now I’m very pleased to welcome Aaron Hook.
Aaron Hook — All right, thanks, Eric. Appreciate that. I think the big thing here is what Josh and I are excited to talk about today is really the the Quest product, but also, the way that we go about it, how we size product, making sure that it’s purpose-built. It’s not a one size fits all application.
I’ve been in the industry for a long time now, 17 years, and I’ve worked with Quest, I think the relationship started in 2012, 2013 with Sunlight Supply, and then with the acquisition followed into now this great relationship where get to work alongside the Quest engineers and really provide excellent solutions to each one of the growers. With that I’ll allow Josh Spalding the true technical expert here to run through quite a bit of information.
Josh Spalding — Hey guys. Yeah. Thanks for joining us today. As Aaron alluded to, there’s a lot of ways you can do stuff. A lot of right ways, a lot of wrong ways. So we just want to take today to provide some general guidelines, talk about the Quest product specifically, but there’s also going to be a lot of other things, like, as you can imagine, your airflow, your HVAC, all that, your cooling system, all that works together to help you optimize your climate.
I’m going to be going to be talking about all that. I’ve been with Quest for a little over three years, and I started working with Aaron almost immediately when I started with Quest. So we’ve got a long working relationship, worked on a lot of projects together. So this is exciting. I put my contact there below. It’ll also be at the end so feel free to reach out if you don’t get your question answered in Q and A, or you have something come up later, feel free to reach out. Always happy to answer those questions. And without further ado, we’ll jump right in. I don’t know if you want to take it back over, Aaron, and talk partnership here.
AH — Thanks, Josh. I think the one key call out here is, as we’re looking at the full solution into the industry, Hawthorne’s really chosen great partners and also developed internal brands that we continue to be that one stop shop for growers. I think that as the industry’s evolved, we’ve matured, we’re looking at truly providing the best solutions that aren’t just, again, one size fits all. It’s a technical solution and we’re really customizing this and making sure that everyone’s individual application, their rooms, if they’re going single, multi tier, whatever it is, that we’re really focused on that and providing the best products and support possible.
Quest really fills that for us on the HVAC dehumidification side. Their product is truly amazing. I would never, ever jeopardize my grow with any other type of product, any other type of dehumidifier, just because it really is built to last, built really tough. And especially with the harsh environments that are created within these certain spaces, the Quest units always stand up to it. I also, personally love working with the team over there too. It’s just great to work with good people that truly want to do the best they can with their products out there.
JS — I guess we’ll take a quick step back. I assume most people have heard of Quest. If you haven’t, we’ve been making dehumidification equipment for a little over 40 years and in wide range of applications. Anything from homes, to industrial application, restoration. But Quest specifically focuses on gardening, and a couple other smaller industrial applications as well, but primarily we do focus on indoor agriculture.
And so to date, we’ve got about 165,000 installs across the world. We are bigger than just North America, so we’ve seen a lot of ways to do stuff, help a lot of growers across the country and we’ll dial in their humidity in their grow rooms. The three things we highlight about our product is the efficiency, the quality, and the service that comes with it.
Not only on the front end of working with you guys to figure out your specific case and what you need and what the best configuration is for your grow, but also on the backend. Things happen from time to time. Maybe equipment issues, maybe of putting more plants in the room than you thought. Things change. And so on that backend, we’re there as well to help support and make sure we’re there to help you guys dial in your environmental control.
That’s a nice segue into efficiency and why it matters so much. The easiest thing to recognize with efficiency is you use less power and the more efficient equipment in there the less kilowatt hours using, the less amp draw, so that has a lot of implications beyond just your power bill. It might mean that you get farther with the amps available.
One of the common things we hear is, “I don’t have enough power,” and the municipality might not be willing to give a power upgrade for a year. So using more efficient dehumidification equipment really allows you to go further on the amps that you do have. Because it uses less power to dehumidify, it also produces less heat. So as you might imagine, less efficient equipment produces more heat. That can have a lot of implications as well. We’ll talk about as far as, do you have to put in a bigger cooling system or do you expect your AC to run more, which also uses more amps? And so less heat’s a big one as well.
Finally, there’s a lot of rebates available. We’ll touch on each of these, but rebates are pretty huge. Depending on where you’re at, every county’s a little bit different. You can get money back for putting in efficient equipment, so again, we’ll talk about how that works in a couple of slides here.
But just to quickly touch on an ROI, return on investment. If we look at a typical, say, thousand square foot room where you’re removing about 1500 pints per day, and look at what a traditional electric costs, on average about 12 cents across the country. If we look at what it looks like to remove 1500 pints a day for 365 days a year between our Quest 506, for example, and a less efficient option out there, 700 pint unit that’s a little bit less efficient. While it may not seem much at face value, just a pint or two per kilowatt hour difference. It really does add up over time. You’re looking at an annual electricity cost of a difference of about $2,000. If you multiply that out over 1, 2, 3, 4, 5 years, and you’re looking at for one room, an electrical difference of about $11,000.
You can imagine as you start to look at this across multiple rooms, depending on how big your facility gets, there can be some serious cost implications and some serious savings by moving to more efficient equipment.
Like we talked about earlier, less efficient equipment also produces more heats. What this doesn’t account for is how much extra are your air conditioners running because there’s a higher heat load in that space? So if we look at the net heat gain on the space for this example case of a 1500 pints in a thousand square foot room, you can see that the less efficient unit’s going to add about 7,200 BTUs more. That’s about 28% more heat.
You can imagine your air conditioner’s going to be running 28% more of the time. There’s some cases I’ve even seen where using less efficient equipment, you have to oversize your AC as well. There’s some big cost implications there. Capital equipment costs of putting in a bigger air conditioner, more run time, all these things add up. So $11,000 on a thousand square foot room is fairly conservative, and I’ve seen that cost get higher — depending on the case we’re looking at.
So we’re always happy to help you run these calculations if you’re comparing multiple solutions. Anyone on the Quest team would be more than happy to run through the calculation with you. I’d be more than happy to as well. So if you’re looking at a couple different options and you want to see how that impacts your specific grow, we’re more than willing to do that.
Then finally talking about rebates. Hawthorne has an exclusive offering with Seinergy. Rebates can be a tricky thing. Like I said earlier, everywhere is a little bit different. Depending on where you’re at in the country, it might be different. It might be a different path to get that rebate. Really there’s two kind of broad categories for how to do it.
One of them is prescriptive, meaning that somebody did the work up front and there might be a set dollar amount you get per unit you put in. Real easy. Unfortunately, it’s a bit rare. Most of the time, the way you’re going to get your rebate is a custom path where you work with the utility company. You say, “Hey, I’m putting in this equipment, which is a little bit more efficient than baseline,” and then they calculate your rebate based on that. Custom paths usually take a little bit more time. So I always recommend start early. It might take two to three months to go through that process, so I always recommend starting your path to rebate sooner.
Bob Gunn with Seinergy, there’s a partnership with Hawthorne there where he’s a pro at this. So it might sound a little bit complicated and it is, but he’s a pro. He knows a ton of people across the industry, and he can essentially help hand hold through that entire process and make sure that you’re getting the most bang for buck as far as when you’re putting in your efficient units.
So to give an idea of what kind of rebates are available, we used the Quest 506 in a previous example. The MSRP on that is a little over $7,000, but you can get rebates as high as $3,300. Anywhere from $480 to $3,300 or so. On the 225, which is another real popular unit you see everywhere. You can get up to $1,700 for putting that unit in.
You might have noticed the Quest question mark there. We’re going to be releasing a new unit here, announcing at MJBiz. So a little bit of a teaser there for you. You might see as high a rebate as about 2200, $2300 for that one. We’re going to have a little bit more on that at the end, if you’re curious, but definitely stop by our booth at MJBiz to see the new unit.
To give some examples of what kind of rebates are out there, I was talking with Bob a little earlier this week and he was able to share a couple examples. Out in Oklahoma, a 30,000 square foot facility out there put in a 126 506s and able to get about $89,000 back. A bunch of growers out in Detroit were able to get about $480 each for every 506 they installed in their facility. Another Michigan cultivator in a different municipality was able to get 70,000 for the 42 units he put in. And then out in Oregon, a hemp cultivator was able to get about $56,000 back in his 11,000 square foot facility for putting in more efficient dehumidification.
So the dollars are there. They really do add up beyond just the ROI on the electrical savings between your dehus and your AC. There’s huge rebate potential, so I definitely recommend hitting up Bob Gunn, make sure to do it a couple months before you’re going to install dehus so there’s plenty of time, depending on what path you have to go to secure that rebate. But there’s definitely some big dollars available and I’d recommend everybody see what’s available for your cultivation.
AH — Hey, Josh, real quick, too. I think just a reminder to the group is, I mean, this is free money. I mean, this is out there today, the utilities offer it. So taking advantage of this and wherever you’re at within your facility, if you’re looking to upgrade or you’re building out a new one, this really does help, especially with all the different retrofit costs. Free money, it’s definitely worth it.
JS — Absolutely. Jumping into the meat of this webinar; how do you get the most out of your HVAC and what I’ll say right off the bat is, I visit a lot of cultivations. I’ve helped a lot of people fix problems. Most of the problems I see really can be boiled down to either improper spec, meaning there’s not enough of one thing, whether it’s dehumidification, whether it’s cooling, whether it’s airflow, or maybe a mix of those things. Or maybe there’s the right amount of capacity, but it’s not installed correctly. It might be installed in a subpar way, which is causing the system not to behave as it should. We’re going to go over each of those and things to watch out for, general best practices and address them all
Starting with proper spec, proper sizing, at Quest we say; water in equals water out. Essentially, however much water those plants are drinking, which is your irrigation minus runoff, that’s what we need to be sized for to remove. To give a quick example that’s easy math. If you’ve got a thousand pints going in your room at about 20% runoff, you got about an 800 pint load. What do you need there? Well if you’ve got one 20 volt power, four 205s might be a great option.
There is something to be aware of if you are aiming for cold, dry conditions, if you’re trying to hit maybe 40 to 45%, or if you want to run your grow rooms a little bit colder, below 70 degrees; you might consider adding an extra unit or two.
The reason is that at colder and dryer temperatures you typically see a little bit of a capacity loss in all refrigeration equipment, including your ACs, including dehus made by other manufacturers. So sometimes you have to oversize a little bit to account for that capacity loss when you do drop your room temps or try and dry out the room.
If you ever have any questions, again, please reach out. We always welcome the opportunity to take a look at your room, look at your loads, and help guide you to the best recommendation.
Once your load, really the next step is proper specs. In this case, we have an 800 pint load. We know we need 800 pints of dehumidification, but what’s the best way to get there?
I always say at least two units per room, but if you do have the space four to six is really ideal. There’s a couple reasons for that. One is redundancy. Having more units means that in the event something happens to your unit or maybe something happens, your breaker goes or something, or power surges, any number of things can happen. Having more units limits your liability there if something does go wrong. It also gives you stages of control. So it’s kind of like thinking more speeds for your room.
These rooms are incredibly dynamic, the loads are constantly shifting, so being able to have 800 pints to use a previous example, or maybe roll back to 600, or 500, 400. The more units we have in that space, the more we can dial into exactly what the room needs, which will really allow us to maintain tighter control.
The third reason is, if we have four units, we can really spread out that dry air. We minimize the risk of having warm pockets of air or dry pockets. If you have one or two units in a room, it may be a little harder to get that dry air spread out.
A question I often get is; should I use desiccant? If you didn’t know, Quest does have a whole line of desiccants. Desiccants use a slightly different technology for, or rather, a very different technology for removing water. It’s a little bit less temperature dependent. The downside is that it’s incredibly inefficient when compared to refrigerant dehus. So more often than not for most cultivations, it doesn’t make sense to use a desiccant because it’s just not as efficient. Most grow rooms are kept in the temperature ranges that you can still use refrigeration dehumidification, and it’ll be four to 10 times more efficient than a desiccant
Most of the time, the answer is no. Like I said, there are a couple niche circumstances where it might make sense to use a desiccant and again, if you have a question, if you’re that niche case, feel free to reach out and we can talk through it and I can let you know. But most of the time, usually refrigerant dehumidification is your best bet.
The next question I get after we go through the capacity, the sizing, and then the specification is, where do I put the dehus? What I generally recommend is spread them out evenly in the room. We want that warm, dry air spread out evenly and that’s if you can. I’ve had a lot of cultivators where, depending on how their room layouts, maybe it’s ceiling high, there’s other equipment in the room, and they’re forced to put all the units on one side. If you have to do that, as long as you make sure you have good airflow, you should be able to make that work.
We’re talking, what’s the most ideal thing you can do. and if you can, it’s spreading out those units. If you had four units, divide your room into a four grids and placing them in the middle of those zones.
I always recommend to hang them above the lights, if you can, just so they’re not casting shade. You could technically put them underneath the benches if you had the space. But most of the time, the place where you have the most space is just hang them above the lights. They’re out of the way. You don’t have people bumping into them. Floors generally, you can’t put them on the floor as well, but again, they might be in the way of people walking around and stuff.
The other thing I recommend is to hang the unit so that the filter side and the exhaust side are at least four feet away from the wall. We want to be cognizant that we’re not somehow impacting the unit’s ability to draw in air. I’ve seen sometimes where units are mounted right up against the wall. When this happens, sometimes that limits the unit’s ability to pull air through the unit and you sometimes see a capacity loss from that. We recommend about four feet, I say, “Hey, at least get that unit a couple feet off the wall for best performance.”
As far as general layout, I always recommend to hang them in such a way that you don’t have your AC blowing into the dehu and vice versa. We want to make sure that we’re not blowing cold air into the dehu because that’ll limit its capacity, because that’s cold, dry air. If the unit’s getting dry air, it can only dry it out so much more. If you’re short changing air like that, sometimes you can see a capacity loss in your equipment.
The photo on the right is from a cultivation I work real close with. You can see that AC vent is really, really close to that intake. What was happening is they really weren’t getting the full capacity of that 225 that they could have been. So really the best thing to do if you’ve got a set up like this is you can either add a little bit more ducting to get that air further away from the dehu or you could potentially maybe flip the dehu 90 degrees or 180 degrees. Essentially, we just don’t want our AC blowing air into the dehu and then likewise as well you don’t want the dehu feeding warm air into the AC as you’ll limit the ACs dehumidification capacity as well.
Finally, you want to make sure the dehus aren’t feeding air into each other. All this, it really impacts the overall dehumidification the units do and might be shooting ourselves in the foot a little bit.
One final thing is, make sure when choosing the room height to factor in that you got to hang ducting up there. You got to fit your ducting for your AC, potentially your AC units, you might have UV filtration, you might have CO2 stuff. You got a lot of equipment to fit, and so giving yourself enough space so that you don’t end up with all the equipment on top of each other in short changing [inaudible 00:23:14].
Generally, it’s a rule of thumb, I think about 12 to 14 feet for single tier is a good range to be. For two tier I like to have at least 16 feet, but if you can get up to 18, it really gives yourself a lot of space. Again, you can always do it with less, but you have to take maybe some extra precautions and there’s some other things you have to worry about when you do that.
Moving on to something else, one of the things I see folks forget a lot is P-Traps. If you’ve ever had water leaking from the corner of the unit, a Quest unit, 99% of the time it’s because there’s not a P-Trap. The reason this happens is the unit is in negative pressure, meaning it wants to suck the water back in. As long as you have a P-Trap with water in it, it prevents the unit from drawing back in water. I put the general guideline here; If you can do about a six inch P-Trap, make sure to fill it with water. That’s enough to keep the unit from leaking water out the sides. As always, you have sitting water there so make sure to clean those P-Traps fairly frequently.
You can see on the picture on the right here, they actually have a little red cap that they had when their plumber did their drain line there. So it’s very easy to pop that off and clean out that P-Trap. I generally recommend if you hard plumb it, give yourself an access port so you can keep that clean, and you should be good to go.
Another note to mention, as long as you’re keeping those condensate lines clean, the water coming off of our coils is essentially distilled water. We use the E code on the coil so that you’re not getting metals and stuff leaching off. It’s very easy to reclaim the water, especially when you pair it with something like the hydrologic system. I don’t know if you want to jump in, Aaron, and talk about that at all.
AH — One thing that, obviously with the recent acquisition of Hydrologic underneath the Hawthorne brand, I’m really excited to start to promote the arc system that hydrologic offers, especially on the west coast with water being such a valuable resource, water conservation, top of mind. It’s getting any of the water we’re pulling from the air, getting it treated, and then getting it back into the supply line rather than it going down the drain. Hydrologic has the units available today. They hook up nicely to the Quests units, it’s going to be plumbed in, and then you’re able to recycle that water. It’s truly amazing and it really fits what’s happening today within the US and around the globe.
JS — Awesome. Something else with ducting the unit. The Quest units can be ducted. You can see here, we do offer a duct kit for our unit. The thing I always recommend is less is more. Don’t get too creative. The photo on the right here is maybe a bit too creative. We do recommend keeping the duct under 20 feet if possible. Try and do as few bends.
There are cases when you do have to duct further than 20 feet, or maybe you do have to add bends in just to get the air where you need it to go. One thing you can do is add booster fans, but I’d really recommend having an engineer do that. There’s really a lot of special calculations that got to be made.
The reason we recommend to keep the duct work a little less creative is really, anytime you introduce a bend or make the duct longer, you increase what’s called static pressure. That basically makess it harder for the fan to move air, so if we’re getting less airflow, that correlates to less dehumidification. If we’re getting 10% less airflow, say, through a unit, you might be seeing on a 506 like here, you might be seeing 50 pints less dehumidification per day, which could really impact how well you’re able to control the room.
If you do want to duct your units, this is some examples of some really excellent duct work. You can see that it’s real minimal, very few bends. The 225, you have the option to have two arms come off, but this is really what just some top tier duct work looks like. It can be a great way to keep those units out of the room and give yourself more space inside the room. Again, if you’ve only got maybe a 10 foot ceiling or an 11 foot ceiling, and you’re running out of space in the room and you got an attic space, consider throwing the units up in the attic space. Then when you do have your maintenance, whether you’re cleaning your P-Traps or changing your filters and you don’t have to have somebody go in the room. So that could be nice as well.
Continuous insulation tips. Something else I see from time to time is control wire getting run next to the power lines. You can see there might be a tendency to zip tie all those cables together to make the install look nice and clean. While I could certainly appreciate a nice clean install, make sure not to run them right next to each other. What can happen is if you have a high voltage cable ran next to your low voltage cable, which is your control wire, what can happen is you can induce voltage in your control wire, and that can sometimes mess with the unit turning on and off.
I’ve seen that on a couple of sites where the control was telling the dehu to turn on, but control wire was running next to a power cable so that control signal was getting interrupted. And they weren’t actually seeing the dehu ever turn on and they were having humidity issues because of it. So it definitely make sure to keep those separate and resist the urge to zip tie those together.
Continuing on, another thing I see is not hooking the units up to proper voltage. Our 230 volt units do need to be between 220 and 240. So it’s pretty easy to verify what you have. 208 is really common in a lot of commercial facilities, but it does have the potential to damage the unit. When you run a lower voltage, you end up running a higher current, and we do see that have a tendency to burn out relays, blowers, and sometimes compressors as well.
30:00
If you do look on the Quest unit, I’ve got a picture there of the tag. It does tell you to keep it between 220 to 240. I know I’ve had a couple customers where they were assured by their contractor that it would be fine, because there is some 230 volt equipment out there that can be hooked up to 208. You can just point them to the name plate. And it does direct them to the proper amount of voltage being hooked up.
What if you only have 208 and 277 available? What I typically recommend if you’re already down the line in your project is using Buck Boost transformers, sometimes there’s not enough space at a site to put in a 230 volt panel, but like the Buck Boost you see here, that’s about the size of a shoebox, if not a little bit smaller. Pretty easy to install. You can just basically take either leg of 208 or 277 and make it the proper voltage for the unit to make sure that you’re not burning out in the fan motors or relays or things like that.
Like I said, the units work incredibly well. Whenever I’m on site and someone says, “Oh, hey, I’m having an issue with a 506.” I’d say 90% of the time it’s because it’s on 208 and we had a relay burnout or something like that. So just something to be aware of. It’s a real easy fix with a Buck Boost transformer, and you can potentially save yourself some headache down the line.
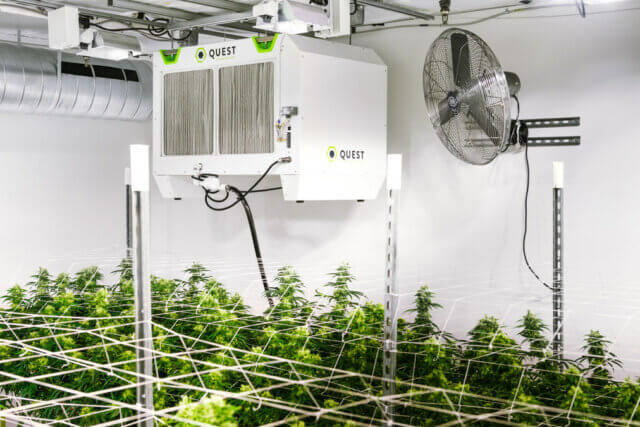
All right. One thing that really goes hand in hand with your cooling system, your dehumidification, is proper airflow. So even the best HVAC system in the world, it’s properly sized, spec, perfectly installed, if we don’t have enough airflow in that space to really make sure the air’s mixing around, it almost doesn’t matter. So I’d say definitely don’t cut corners on the airflow, be very intentional about how you’re moving the air around the room. What’s good is you don’t have to guess. Hawthorne has a whole team of technical people that are willing to help you with your fan layouts. As you can see here on the bottom right, there’s an example of a proper layout for a grow facility.
Essentially, there’s a couple things you want to make sure your air flow system does. You want to make sure you’re mixing the air in the room because we want to make sure that we’re avoiding hot pockets. We want to make sure that we’re moving the air that’s underneath the benches and canopy. CO2 tends to be a heavier gas, so if you’re supplementing your room with CO2, that will have a tendency to fall to the bottom of the room. We definitely want to make sure that we’re getting air moving underneath those benches and kicking that air up and making sure it mixes.
We also need above canopy air movement, making sure the plants are having a nice wiggle to them that we’re getting about a foot per second or so across the canopy. If you’re using a multi-tier system, some sort of rack ventilation system is going to be key.
I’ve worked with quite a few people that have tried to get away with not using it, and it’s really just one of those things. You got to have some way to get the air in that lower tier, because you’ve got effectively a metal ceiling. So really important to have some type of rack ventilation system to make sure that air is moving.
One thing I say is oscillating wall fans. They’ve been in the industry a really long time and a real common thing to use. If your rooms are really getting over a couple hundred square feet, I’ve generally found that just having those mounted along your walls is enough. Typically, you need some inline fans in there to mix air around the room and some under canopy stuff as well.
Aaron, I don’t know if you want to touch on some of the air movement stuff and Hawthorne’s technical team’s capabilities.
AH — Thanks, Josh. I think one big call out here is as you’re working through and any of the attendees as they’re building out the design of their facility, Hawthorne does, in partnership with Quest, but also our internal teams, the ability that the top right there is actually computational fluid dynamics, also known as CFD. We’ve kind of branded it airflow mapping, but what that does is we can regenerate the 3D structure of the room and then we can plan for where the airflow is going to land as the plants mature, as they go through. Obviously, it’s all geometry, but planning ahead and making sure that the fans are located in the right location and that we’re just getting a good overall balance within that space.
Micro climates, really, that’s what we’re trying to prevent with all this different equipment, but having this new visibility into what’s happening with the airflow, where it is getting it, and especially before you ever have to install it, we can plan ahead and say, “Hey, mount this at seven feet on the wall and have it angled this direction.”
As far as a charge for CFD analysis, we actually offer this as a complimentary service based on the total package you buy from Hawthorne. Before, we had offered it with a lighting package or a HVAC package, but just as you’re going through and you’re designing it, talk to your retailer or talk to the Hawthorne rep and they’ll get you in there and stuff and talk about what qualifications to get that type of service.
JS — Awesome. Yeah, super key. Like I said, the best HVAC system in the world can’t overcome or airflow and all these things do work together to really ensure that you’ve got excellent climate control.
One other thing I do like to make a note of is a note on control. Controls can really be broken down into three broad categories. You’ve got your most basic, which is your thermostat/humidistat. You’ve got your intermediate level controls, which is your off the shelf gardening controls. They’re pretty much set up where you can take it and DIY your control system. And then beyond that, you have your customizable building management system, and that’s really your advanced.
For a long time, the industry thermostats/humidistats were used and you can get them to work quite well to control your space, but there are some limitations. I always encourage people to try and implement some of the elements below, which would be zone control, getting remote or internet access. A lot of the intermediate options allow you to stage your units as well. One of the biggest things is data logging. Being able to look back and know what’s going on in your room without having to be in there. You can be able to log from your couch at home to see what your grow rooms are doing is pretty huge. As with anything, you always have to dial in your space and being able to make data driven decisions is huge.
Like I said, you can still make a thermostat/humidistat combo work. You can still get those things to be staged, but often they don’t data log or really have a remote access. So there’s some limitations there. I always encourage people to, again, everything works together. Your system’s only as good as the weakest link. So consider potentially going at least within an intermediate level control, just to make sure you’re getting the most out of your HVAC system. And again, that you have data to really make decisions about your airflow and other things like that.
Along that line, don’t forget to calibrate your sensors. Any temperature sensor or humidity sensor out there probably needs to be calibrated from time to time. I’ve got a picture of our Quest humidistat on there, but really, any humidistat out there, any control system I’d highly recommend using a hygrometer just to calibrate it. If your sensor’s a couple percent off and that’s your eyes into the room, your HVAC system can only control based on what it’s seeing in the room. So always, always important to make sure your stuff’s calibrated so that again, you’re dialing in your humidity and your temperature as tightly as possible.
That’s pretty much all I have on, as far as proper spec and installation. As promised, I’ve got a sneak peek of our unit coming out. Come by our booth. Our number’s 3541. And if you want to be the first to hear, you can also head to our website, /something-awesome-is-coming/ and sign up for email alerts and you’ll be the first to hear about the units coming out and you’ll be able to see the unit live at MJBiz here in a month or so.
I guess now’s a great time to open up for questions. I saw a couple things pop into the chat, so we can jump into that unless you have anything you wanted to add, Aaron.
AH — One thing on the new product that we’re unveiling at MJBiz, it does sound like we’re going to give away a couple free units there too. So make sure you do stop by the booth, sign up and it’s an incredible product and just super excited to work with the Quest team on getting us out there for the growers.
JS — I’m excited. It’s going to be awesome.
ES — Excellent. Well, Josh and Aaron, thanks so much for that presentation. While we’re on this subject, I will definitely remind the audience to jot down the information on the screen there, and certainly keep an eye out from Cannabis Business Times as we’re working with the Quest team to run a sweepstakes for one of those units as well. So certainly a lot of exciting things coming up in the very near future.
We did have a few Questions coming in during the presentation. I’ll remind the audience to check up the Q and A box at the bottom of the screen and type your questions in there. I’m going to hit a few of those. I know, Aaron, you were addressing a few along the way, but just for the benefit of the crowd here, I’ll start with one; Do you recommend these units for greenhouses? And maybe I’ll add a little bit to that. Is a lot of what we’re talking about here applicable to the greenhouse environment as well in general? Or are there different considerations that greenhouse operators might want to keep in mind?
JS –You can definitely use these units in greenhouses. We have quite a few greenhouse customers. Generally, ventilation is one of the main ways of control and humidity in the greenhouse, but often when you hit the night cycle, it may be too cold where you’re getting too much of the humidity swing or something like that if you try to use ventilation at night, because especially, if you’re in maybe a colder climate where it might be below 20 degrees outside, you probably don’t want to ventilate with 20 degree air because it just throws your whole climate off. So no, absolutely. Generally, one of the best strategies for controlling humidity during the night cycle in a greenhouse is going to be putting some standalone dehumidifiers in there.
We typically calculate it about the same way we do an indoor grow. There’s obviously some other variables. Generally, greenhouses aren’t as well sealed, so you do have to account for infiltration from moisture from the outside leaking in and things like that. But no, like I said, we do have a lot of greenhouse customers, and generally it tends to be the most reliable strategy for controlling your humidity at nighttime when it’s either super cold or potentially rainy or foggy outside and you don’t want to bring that air inside your greenhouse.
ES — As a follow up, and speaking of the outdoors, anything to keep in mind as we head into winter months? I mean, in many parts of the US at least and Europe and elsewhere, obviously the temperature will drop significantly. Any winter considerations that might be worth mentioning here?
JS — As far as the Quest units, they should always be installed indoors. They’re not an outdoor unit. So generally, there’s not any special considerations you have to take for the Quest units because they’re installed indoors. So hopefully shielded from the element.
As far as your cooling system, if you’re in a cold climate, make sure you got a cold weather kit. So your AC, for example, isn’t freezing up if it’s negative five outside or something like that. And most manufacturers have what’s called the low ambient kit or a cold weather package for their air conditioner. I’d say if maybe you started in the summer and you haven’t hit a winter season yet, I’d maybe double check with your contractor and make sure you have something installed there. Otherwise, what happens is a lot of air conditioners, for example, will if not change from the factory setting, will stop running when it’s 40 degrees outside because it’s a home run business. You probably don’t need cooling when it’s 40 degrees outside, you probably just need heating. Double check that your equipment’s been set up for some winter operation. You should be good to go.
ES — Excellent. I know the phrase, purpose built has been sort of a theme throughout this presentation. We have a question here regarding the advantages of having the dehumidification equipment decoupled from the HVAC system. Could you maybe, I suppose, elaborate on that thread a little bit?
JS — There’s a couple advantages to doing decoupled. I think one of the biggest is that your dehus, by and large, do your dehumidification at night and your air conditioners do your cooling and your dehumidification during the day. Maybe during some heavy waterings, you have your dehus kick on, but for the most part, I’d say your cooling system does the brunt of the work during the day, your dehus do the brunt to work at night
What that really allows for is kind of a 12 hour break. Your cooling system gets to turn off, everything gets to cool down when you decouple it. When you don’t decouple it, you end up, you’re running those systems 24/7, hours on end, and even with a well-built system that’s a tall order. The nice thing about decoupling your system is you really are giving your cooling system a 12 hour break for the most part every day, so I think you can really extend the life of your equipment doing that.
The other thing is that it allows you some allows you some more redundancy. By having more systems serving that space, you’re really limiting, you don’t have all your eggs in one basket. If you have mechanical problems with your AC, that’s okay, your dehus are still there to kick in and handle the load. You might have to dim your lights a bit, but you should be okay till you can get a tech out there to fix it. It just really limits your liability.
With the Quest units and decoupled by pairing a really efficient dehumidifier with even just a standard cooling system, because the efficiency of that dehumidifier, your HVAC system as a whole becomes a lot more efficient.
Some of the other things is if you do change anything down the line, I don’t think I’ve had any projects start on day one, that by the time it was actually built, didn’t change something. Even once it’s built, a lot of times stuff will change. Some guys will go from single to two tier, maybe add another bench, maybe add a couple plants, maximizing the square footage of those rooms.
If you do basically increase your load, if you add more plants in there or something like that, you’re increasing your water load, you need more dehumidification. It’s real easy to just add a couple more dehus. Hopefully you have enough cooling. That might not be as easy to add, but what’s really nice with the Quest units is they’re very easy to install and they’re generally stocked. So if you do find, “Oh, man, I didn’t put in enough, or I added more plants so I need an extra couple hundred pints of dehumidification,” it’s really easy to add and step into exactly what you need.
I’m trying to think, yeah, that’s generally some of the top benefits for doing the decoupled.
ES — Perfect. We’ve got a question here that relates back to the slide with the examples of excellent duct work. As we may recall the photo on the left, this person in the audience is asking whether the unit can be laid on its side to eliminate a 90 degree bend. I don’t know. I mean, and we could certainly generalize that, but I know that photo came up earlier in the presentation. Is that something that’s possible to eliminate some of those issues?
JS — Definitely not. You don’t want to turn in the unit ever on its side, if you can help it. If you’re trying to get it into say a crawlspace, you do have to turn it on its side, make sure to leave it overnight at least. I think of it like a refrigerator. If you ever are transporting a refrigerator and you have it upside down or on its side, you can’t just plug it in when you get home. You have to sit it up right, let it sit for a second it before you turn it on. The units do have to be upright. The refrigeration system will not work properly if the unit’s on its side.
ES — Excellent. I know there’s obviously a lot of variables that we talked about, but in terms of lighting, could you talk a bit about the effect of grow operation that may be using LEDs and how that type of lighting system might affect dehumidification needs in the room?
JS — LEDs, if you think of a general, say, thousand square foot space, an LED per square foot’s going to add a lot less heat to your room, about 40% to your per square foot to your grow room versus maybe a high pressure sodium light. Since it’s adding less heat, you generally, you’re going to put in a smaller air conditioning system, which in turn is going to do less dehumidification than the same cooling system you might have put in for your HPS sliding.
Generally what I find is that when doing an LED facility, you might have your dehumidifiers helping out more during the daytime than they would in maybe an HPS grow. One of the common things I hear is that plants transpire more under LED. They actually transpire about the same, maybe even a little bit less, depending on the cultivation style. What’s happening is that your air conditioner, which does the bulk of the work during the lights on, just got smaller because the lights aren’t as hot. It doesn’t need to be as big, because it’s a little bit smaller, it’ll do a little bit less dehumidification, and then you might have your standalone dehumidifiers, which are there for your nighttime cycle. Those might end up kicking on more often during the daytime to help out.
Most of the time, you don’t need to add more than you would normally, meaning that it’s probably, if you have a thousand square foot room, you probably have the same amount of dehumidifiers in there, regardless of whether it’s HPS or LED. Sometimes you have to add a little bit more. It really depends on the case, especially since normally in LED, you’re running a little bit warmer and wetter as well, so you’re getting a little bit more capacity out of your dehus. Like I said, there’s some niche cases where you might have to add some more dehumidifiers, but most of the time water in, water out, you’ll be good to go. What you might see is that they just run a little bit more during the daytime than you’re used to.
ES — Certainly. We have a few questions here. I know we touched on external cold temperatures. Again, realizing that we’re talking about indoor units here, but we do have questions relating to the climate in Jamaica, the climate Africa. There wasn’t a country specified there, but anything worth touching on regarding external either high or overly humid climate conditions?
JS — If you’ve got, say a really hot climate, for example, you’re probably going to have to oversize your air conditioning system a little bit. I’m based out of Los Angeles, 75 degrees all the time. It’s wonderful, but if I go four hours inland to Las Vegas where it’s a bit hotter, a desert climate, the cultivations there have to put in more air conditioning. The reason is, a 20 ton air conditioning, for example, is rated at 95 degrees outside, but when that outdoor temperature starts getting up to 110, 115 degrees Fahrenheit, or 120 sometimes, what you find is that 20 ton does a little bit less cooling, it gets a little bit less efficient, and you might lose 10 and 15% capacity on that unit.
So if you’re building out in a hot, arid climate, I’d run the math, make sure your engineer is accounting for those hot temperatures, and understand that general rules of thumb like a half to of light might not apply to you. You might have to oversize beyond general rules with them. I’d expect to have to put in a bigger air conditioning system than what you might typically see on Instagram or in maybe some industry averages just because you’re in a hotter climate. You’re not going to get as much cooling capacity come those summer months.
If you’re in a real humid climate, do your best to make sure your building seals up well. You may have to add in a little bit extra dehumidification to account for what we call infiltration, because that outside moisture will have a tendency to leak into the spaces that are drier. Every time somebody opens a door to go in out of the room, that’s a chance for moisture leak in as well.
In my projects, my cultivators that grow in more humid climates, a lot of them find they might have to add a little bit more dehumidification than the dry climates, just to account for some of that moisture leaking. It’s not anything crazy. They don’t have to put in double the capacity or anything like that. A thousand square foot room, for example, you might have to put in an extra, I’m just ballparking this, but say 50 pints of dehumidification, assuming you’ve got good SOPs and people aren’t leaving the doors open, things like that.
ES — We got a question here. I think maybe relating to that recent lighting question. This audience member is asking if there’s a ballpark percentage difference in transpiration rates from day mode to night mode and how that might be accounted for on the dehumidification side. Meaning, is there a significant difference from day to night that the plants are transpiring?
JS — That’s a great question. Transpiration rates do vary quite a bit. As soon as the plant wakes up, that transpiration rate’s going to pick up. There’s a whole lot of factors that will affect that transpiration rate. The BPD, what are they keeping their rooms at as far as temperature and humidity, what’s a wattage per square foot they’re running?
I don’t know that there’s a general rule of thumb answer for what the transpiration rate might be. Generally, the nighttime transpiration rate, at a minimum, as soon as the lights go off and the plants start to go to sleep and we see that rate fall, generally, it’s somewhere between 20 and 40% based on a bunch of different factors. It’s going to vary between strains, depending on your irrigation strategies, whether you water once or multiple times throughout the day. There’s probably 10, 15 different factors that are going to go into this on what that is and it’s one of those things that I think there’s a good rule of thumb.
ES — We did have a question here relating to water load measurement and aeroponics. I know it was sort of addressed by Aaron in the Q and A box, but just wanted to touch on that real quick while we’re here. Any sort of best practices for water load measurement in general, and also with the aeroponic producers? I mean, this may be a bit more complicated than a short answer, but anything worth bearing in mind on that side of things?
JS — As far as how to the water load in the facility? Yeah. What we try to boil down to with water in water out is understanding what the plants are drinking. If you don’t know necessarily what you’re feeding each one, there’s a couple other metrics, maybe how often you’re refilling your feed tanks and things like that. There’s a couple different ways we can approach the problem to back into what are the plant drinking. I’d say, yeah, it’s going to be real case dependent. If you have any specific questions about your application, reach out after this webinar, we can talk through it, for sure.
ES — I’ll definitely remind the audience here to jot down that contact info and we’ll be making sure everyone gets connected after this event. I’ll remind everyone also that we have been recording today’s webinar and we’ll be distributing the link via email to all registrants very soon here. So thank you. Thanks everyone for attending and certainly to Josh and Aaron and the whole Quest and Hawthorne teams. I want to thank you all for providing the information today. This was fantastic.
Learn more about HVAC and maximizing your growing environment here ⟶